
Network review
Network Review is the panel on the left of the map. It runs five checks over the model and lists what each one found. It also takes you to each finding on the map: it selects the assets involved and zooms to them. The next thing you do is fix the fault.
The checks look for the faults that are invisible at map scale and fatal to the engine:
- A node a few centimeters off the main it is meant to sit on.
- Two mains that cross with no junction between them.
- An estate connected to nothing.
- A pipe with no diameter.
EPANET reports some of these faults after a failed run, in its own terms. These checks report them before the run, against your assets.
Opening it
Section titled “Opening it”Click the Network Review icon in the activity bar. The activity bar is the column of icons at the left edge of the window. While the panel shows Network Review, the same icon closes the panel. You can also press Toggle left panel at the right of the toolbar, or press Ctrl+B.
Network Review shares the left panel with Collections. If the left panel shows Collections, the Network Review icon switches the panel to Network Review.
When a GIS build finishes, the panel opens by itself. The checks help the most at this point. At all other times, the panel starts closed. See Build a model from GIS. The interface covers the panel and its neighbors.
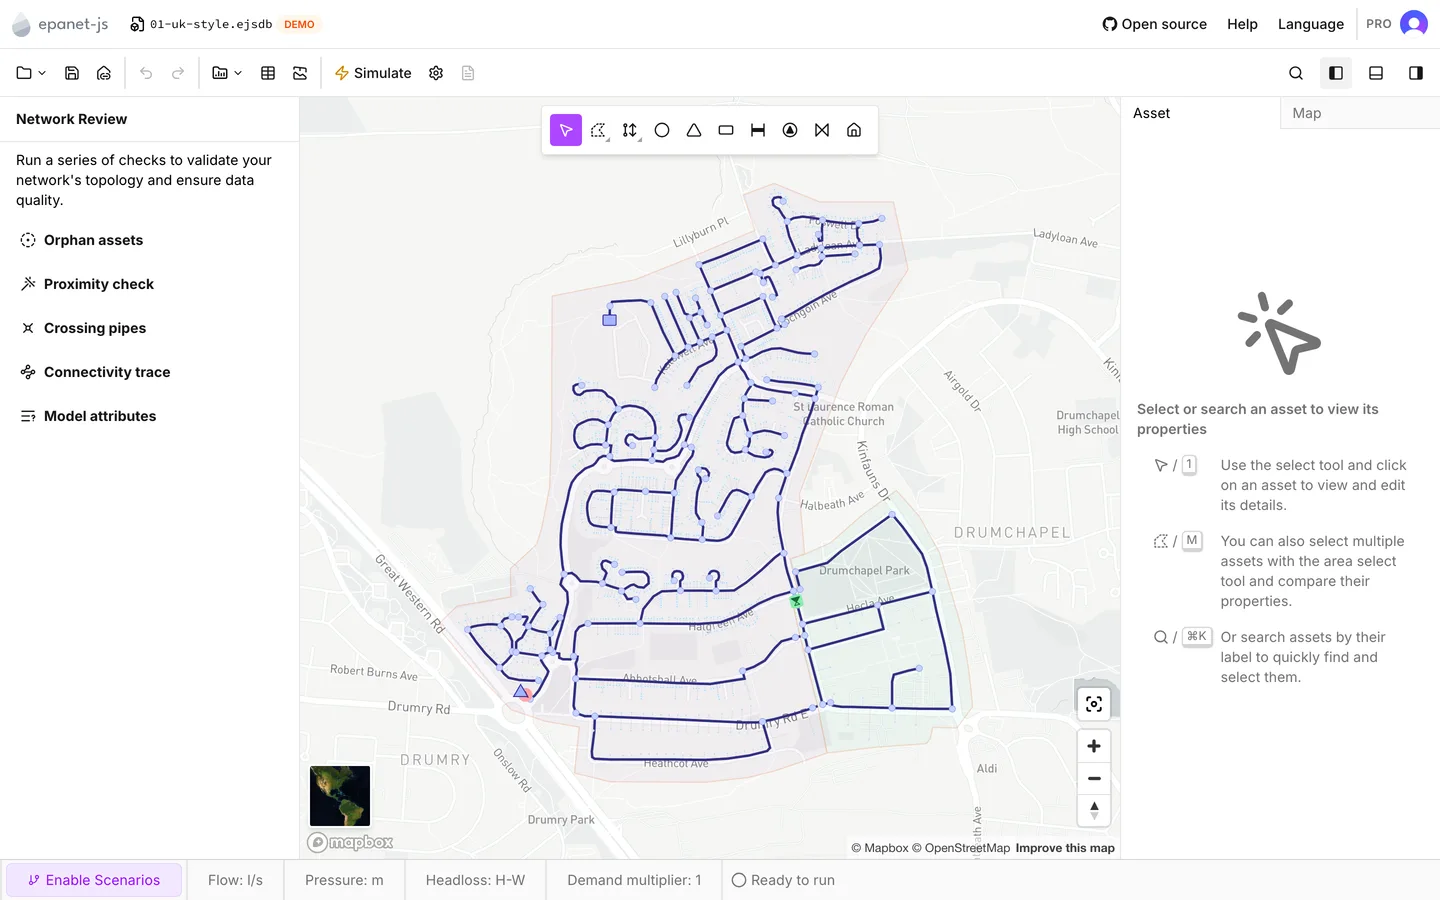
Click a check to open it. You can also move the highlight with ↑ ↓ and press Enter.
Three of the five checks show an issue count beside their name: Orphan assets, Connectivity trace and Model attributes. These three are the checks that stop a run, and they are the three that run again on their own. They run a fraction of a second after you stop editing, with a spinner over the list while they work.
Proximity check and Crossing pipes never show a count on this screen. They are review tools and they cost more to compute. They run only while you have them open.
The same three checks run when you press Simulate. The app shares the results, so a review you already did in the panel does not happen twice.
Signing in, and what a plan buys
Section titled “Signing in, and what a plan buys”While you are signed out, the panel carries an Early access badge. If you then open Orphan assets, Proximity check, Crossing pipes or Connectivity trace, the app shows Early access feature instead. Get early access starts the sign-in. When you are back, open the check again. Any account works, because these four checks are not part of a paid plan.
Model attributes opens without an account. On a plan without access, it still shows every rule that failed and how many assets each rule hit. A paid plan is necessary only to open a rule and get to the assets themselves. See Plans and licensing.
What the five have in common
Section titled “What the five have in common”Every check runs over the active topology. An asset that you disabled is left out of all five checks, exactly as it is left out of the exported INP and of the run. There is no setting that includes disabled assets. If a check reports nothing on a network that you know is broken, look again with Active topology in mind.
Each check opens its own screen. The screen holds:
- A back arrow and the title.
- A one-line summary of how much the check found.
- A sentence that says what the check does.
- The list of findings.
When you select an item, the app selects the assets involved and zooms the map to them. An item leaves the list when you fix the fault that it points at.
When a finding has one obvious fix, its row carries a button that applies the fix in place:
- Connect on the two advisory checks.
- Delete or Disable on Orphan assets.
- Disable on Connectivity trace.
The section for each check says what its fix does.
The two advisory checks also take a verdict. When you judge a finding intended, Archive on a Proximity check or Crossing pipes row sets that finding aside. The finding moves under an Archived header at the foot of the list, where Restore brings it back.
Archiving records the judgment and does not touch the model. It lasts for the working session only. The project does not save the archive, so a model that you open later starts with the full list again. The keyboard reaches both actions: Delete or Backspace archives the selected finding, and Enter on an archived finding restores it.
The lists are built for the keyboard. To work through two hundred findings with a mouse is two hundred round trips to the panel.
| Key | In the list of checks | Inside a check |
|---|---|---|
| ↑ ↓ | Move the highlight | Select the previous or the next finding, and fly to it |
| Enter | Open the highlighted check | Apply the suggested fix to the selected finding, then select the next one |
| Delete Backspace | — | Archive the finding, on the two checks that archive |
| Page Up Page Down | — | Move one screen at a time |
| Home End | — | First or last finding |
| + - | — | Zoom the map in or out without leaving the list |
| Esc | Clear the highlight | Clear the selection, then go back |
Orphan assets
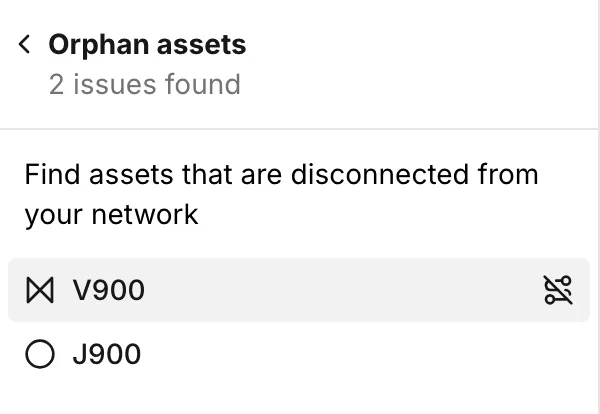
Section titled “Orphan assets”Blocking. An orphan is an asset that the rest of the network does not reach at all:
- A junction, tank or reservoir with no link attached to it.
- A pump or valve whose nodes at both ends carry no other link (a pump between two junctions that go nowhere).
- A link whose node at one end is missing from the model. This is a damaged file, not a modeling mistake.
A pipe between two junctions that connect to nothing else is not an orphan. The three of them are a small sub-network, and Connectivity trace is the check that finds it.
Each row shows the type icon of the asset and its label. What to do about an orphan is a judgment about the source data, not about the model:
- If the orphan is a data entry mistake, delete it. Delete it also when it is a stray point that a GIS layer brought in and that has no place in a hydraulic model.
- Connect it: drag the orphan onto the node or the pipe it belongs to. A node dropped onto another node merges the two. A node dropped onto a pipe splits the pipe at that point. The direction matters, because the merged node takes the position of the node you drop onto. Both moves are covered in Drawing and editing.
- If the orphan is real but not part of this study, disable it. A disabled asset keeps all its properties, and it drops out of the checks, the run and the export — see The Asset tab.
The row offers the likely call as a button: Delete on a stray node or a damaged link, and Disable on an isolated pump or valve. Press the button, or press Enter with the finding selected.
A tank or a reservoir gets no button, and this is deliberate. A source drawn ahead of the network it will supply is normal work in progress, not a fault to correct in one press. The source still appears in the list. It is also the one orphan that does not stop a run, because EPANET solves a model with a disconnected tank or reservoir. Simulate waits only on the other kinds.
Proximity check
Section titled “Proximity check”Advisory. This is the near-miss check. It finds a node that sits within a set distance of a pipe it is not connected to. This is the most common fault in imported GIS data. A node that is a millimeter off a main looks connected on any screen, and the engine does not see it.
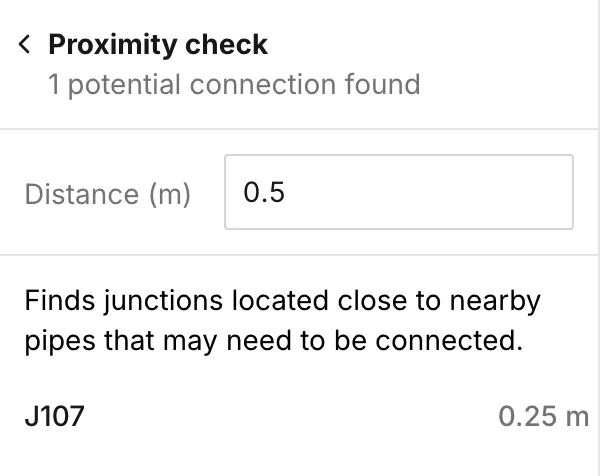
Distance at the top of the panel sets the search radius, and the list is computed again as soon as you change it. It starts at 0.5 m, or at 1.5 ft on a model whose length unit is feet. Each row gives the label of the node and its true distance from the pipe, in the model’s own units. When you select a row, the map frames the node and the pipe together and zooms in tight on the gap.
What the check will not report:
- A node with no links at all. That is an orphan, and this check skips it.
- The pipes the node is already connected to.
- A gap where the nearest point on the candidate pipe is within 0.1 m of a node the reported node already shares a link with. This is what stops every junction in a dense run of pipes from reporting its own neighbors.
The check reports only one finding per node: the nearest pipe of the candidates.
You fix a finding with a press or a drag. Connect on the row snaps the node onto the pipe: it splits the pipe and joins the two. Where the gap closes onto the end node of the pipe, it merges the node into that end node instead. Enter does the same from the keyboard.
The drag is still there when you want to place the connection yourself. Select the node and drop it onto the pipe. This splits the pipe and connects the two in one gesture.
Crossing pipes
Section titled “Crossing pipes”Advisory. This check finds pairs of pipes whose lines intersect with no node at the crossing. Each row gives both pipe labels with their diameters beside them, and a dash where a diameter is missing. When you select the pair, the map frames the intersection.
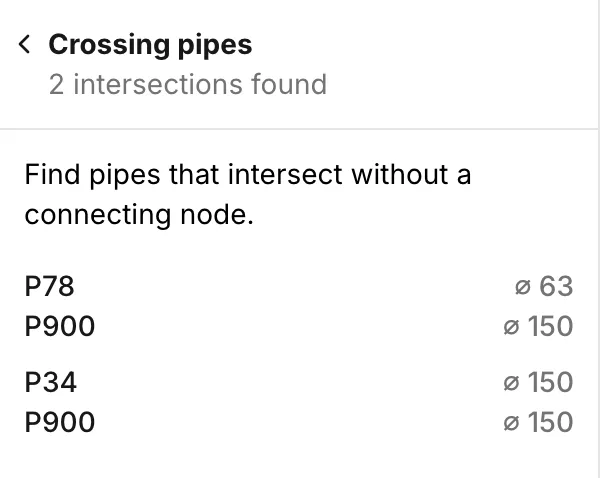
The check does not report an intersection within about half a meter of an existing node, so a proper cross junction does not fill the list.
A crossing is not automatically a fault, and no check can tell you which crossings are. Water moves between two links only through a node they share. As a result, the model treats a crossing without a node as an overpass.
An overpass is right in these cases:
- A main carried over a river on a bridge.
- A main through a culvert.
- A distribution main that crosses a trunk main at a different depth.
An overpass is wrong for a four-way junction that lost its node in translation. That is a judgment about the ground, not about the model. The two diameters in the row are usually enough to make it, and the basemap under the crossing settles most of the rest.
Where the crossing must be connected, press Connect on the row. The app places a junction at the intersection. It splits both pipes and leaves one node that joins all four halves, with the elevation of the junction read from the terrain. You can also draw the same fix by hand: put a junction onto one of the two pipes, then drag it onto the other. See Drawing and editing.
Where the crossing must not be connected, press Archive. The finding moves under the Archived header and out of the count, and it stays there for the rest of the session.
Connectivity trace
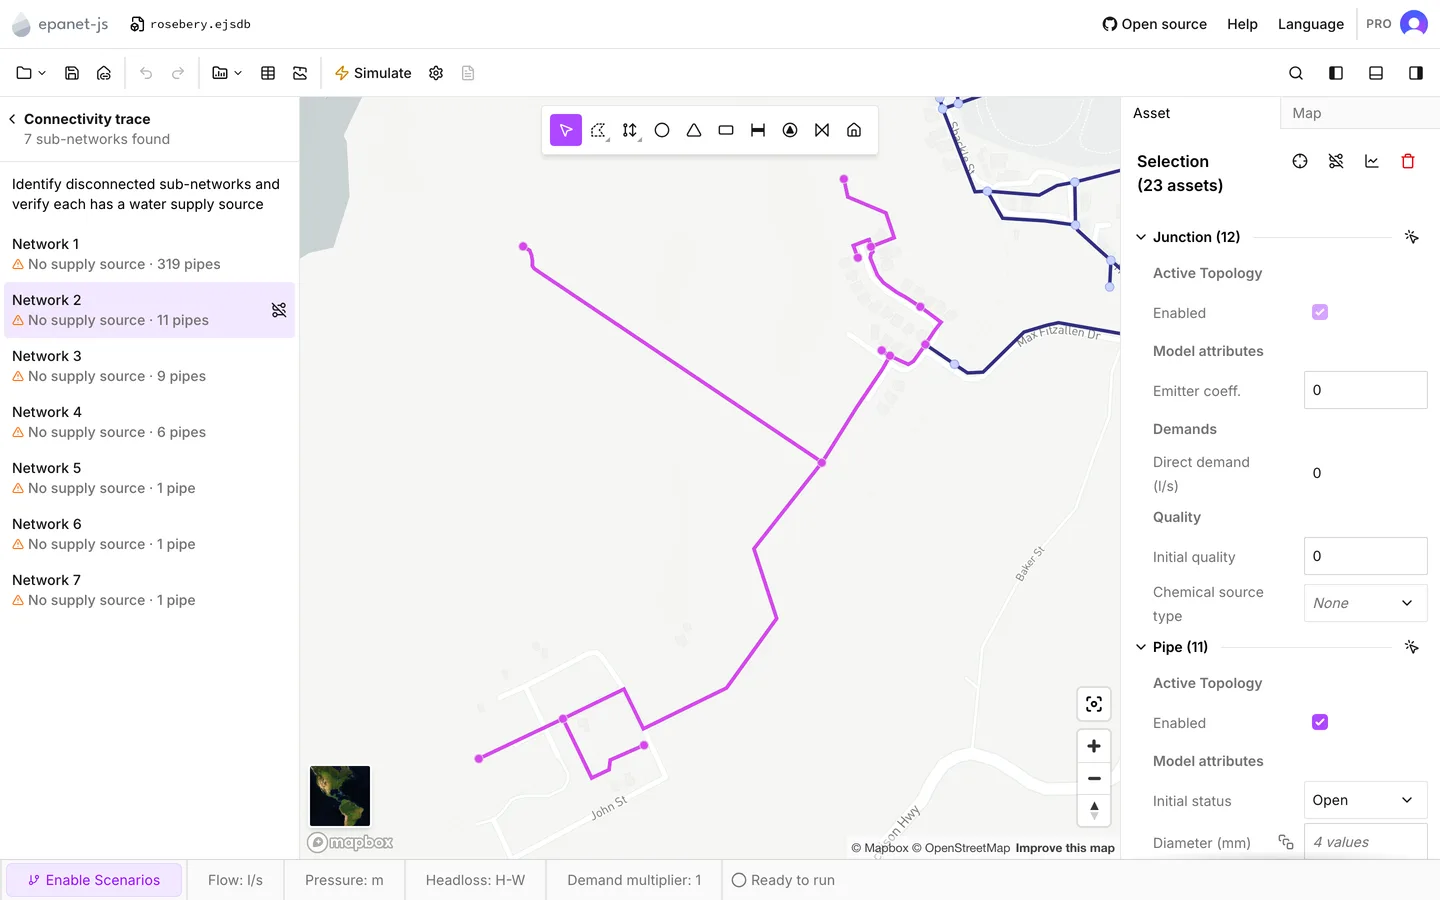
Section titled “Connectivity trace”Blocking. This check traces the model into its separate sub-networks. It tells you which of them has no source of supply.
Each row is one sub-network. The rows are numbered from the largest down, so Network 1 is the biggest. Under each row are its count of supply sources and its count of pipes.
A supply source is a reservoir or a tank. A sub-network with neither one carries a warning and reads No supply source. These are what the issue count on the front screen of the panel counts, and they are what stops a run. When you select a row, the app selects every asset in that sub-network and zooms to fit it. This is also the fastest way to see how big the disconnected part actually is.
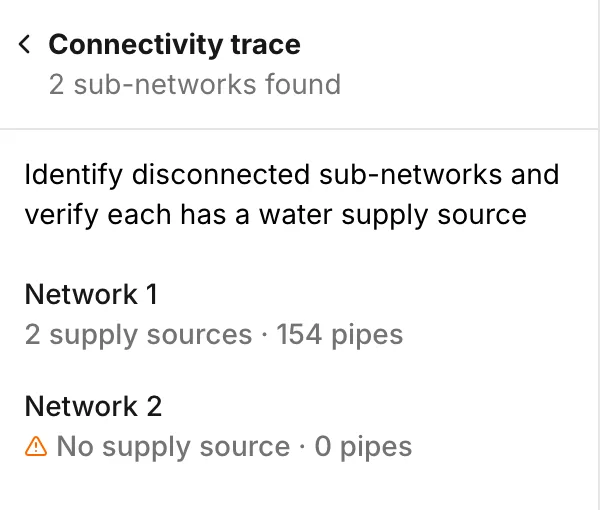
This check does not list a lone node, because a sub-network needs at least two nodes to appear. Run Orphan assets as well, not instead.
More than one sub-network is not automatically wrong. A model that deliberately holds two distinct systems traces as two, and both are fine as long as each one has its own source. A sub-network with no source is always wrong, and that is the case this check blocks the run on.
When a sub-network is real but not part of this study, Disable on its row retires it in one press. The app disables every asset in the sub-network, and that takes it out of the checks, the run and the export at once, exactly as disabling it from The Asset tab does. The button appears only on rows marked No supply source, because a supplied sub-network is a working network and not something to disable from here.
The usual causes are the ones the other checks find first: a near-miss that never snapped, a crossing with no node, or a valve deleted and not replaced. This check is the one that tells you whether the earlier fixes joined the network back up.
Model attributes
Section titled “Model attributes”Blocking. The other four checks read the shape of the network. This one reads its values, and it reports every asset whose attributes make the run fail or mislead you.
The app groups findings by rule rather than by asset, errors before warnings. Each row names the rule, for example Pipe diameter missing or Tank initial level must be between the minimum and maximum levels, with the number of assets affected underneath. When you open a group, the app selects all of those assets at once and lists them individually.
Select all in the header of that list puts the whole group back into the selection. This is how you get from a rule to a bulk edit in The Asset tab, or to a paste into Data tables. If the side panel is closed and you select an asset in the list, the side panel opens on the Asset tab. Select all opens it in the same way.
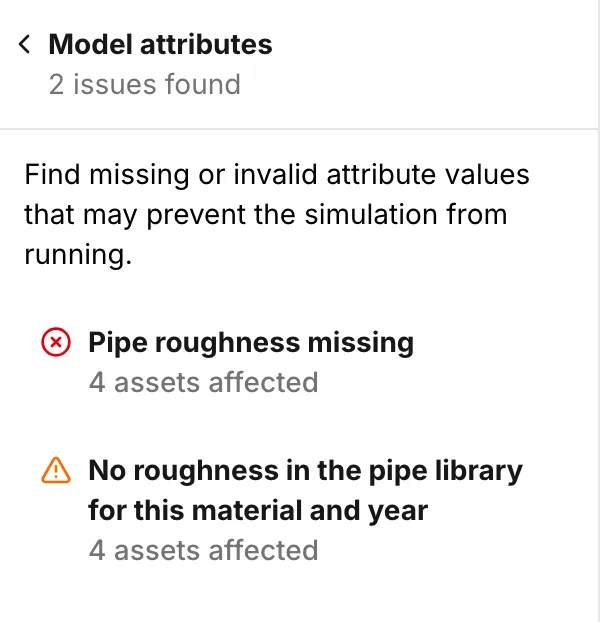
The count on the front screen of the panel is the number of rules that failed, not the number of assets. Three rules across four hundred pipes read as 3 issues.
What the check looks at:
- Values that must be there: elevation on junctions and tanks, head on reservoirs, and diameter, length and roughness on pipes. A valve needs a diameter, and every valve but a GPV needs its setting. A pump needs the power, the curve or the curve reference that its definition asks for.
- Values that must make sense: diameters and lengths positive, and minor losses, speeds and prices not negative. A tank needs an initial level between its minimum and its maximum, and a maximum more than its minimum. A mixing fraction must be between 0 and 1, and an installation year must be a four-digit year.
- Pump curves: the curve must exist, and its points must be usable — see Curves.
- Pipe material against the pipe library. Where a pipe has a material and no roughness of its own, the material must be in the library, and the library must give a roughness for that material and that year. Both are warnings — see Pipe library.
- Customer points. The check reports a customer point that is not connected to a pipe as a warning — see Customer points.
The check does not run a rule that does not apply. A tank defined by a volume curve is not asked for a diameter or a level range. A reservoir is never asked for an elevation, because it carries a head. The check also reports only the first failure for each field. As a result, a pipe with no diameter appears under Pipe diameter missing, and not also under the rule about positive diameters.
Before a run
Section titled “Before a run”The three blocking checks run every time you press Simulate, whether or not you ever opened the panel. If one of them found something, the run stops at Before running the simulation. An orphan tank or reservoir is the one exception. The dialog names up to three of the failing rules and counts the rest, and it offers two ways out:
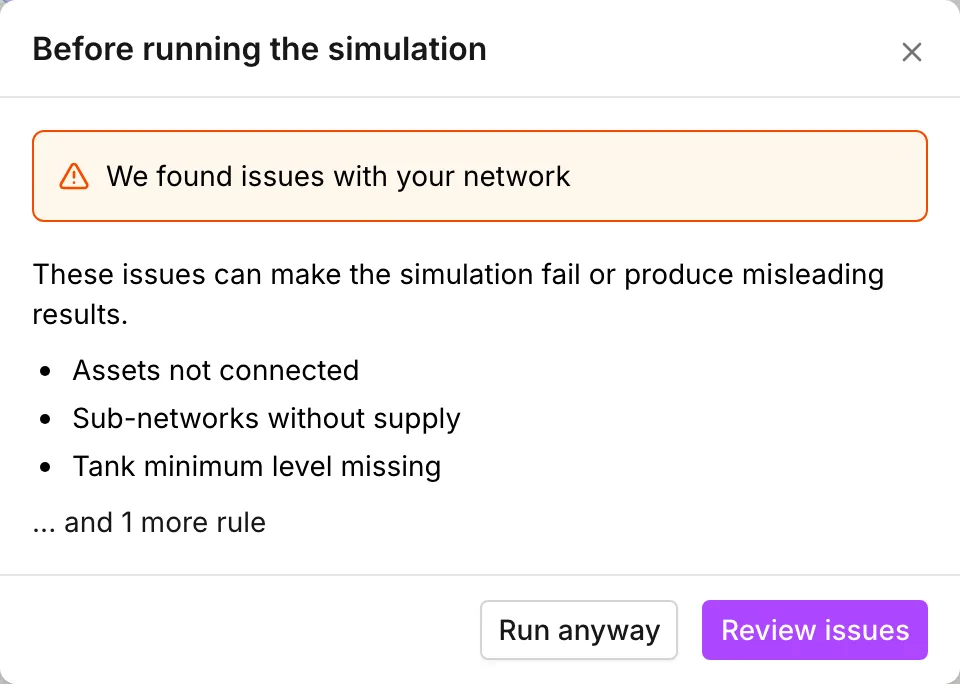
- Review issues opens Network Review. If only one check failed, it opens on that check. If more than one failed, it opens on the list of five.
- Run anyway runs the model as it stands. The findings are real, but they are not always fatal, and the fastest way to learn what a warning costs you is at times to run the model and look.
If the checks themselves cannot finish, the same dialog appears with the same two buttons, and it reads We couldn’t finish checking your network. A check that breaks is never the reason a model cannot be simulated.
See Running a simulation for the rest of the run.
- Drawing and editing — merging, splitting and moving, which is how you fix most of these findings.
- Build a model from GIS — where the panel opens by itself, and why.
- Rosebery — a worked example that runs the first four checks on a real broken import.
- Running a simulation — the pre-run check and what happens after it.