
Scenario work
This is the third of the three jobs people arrive with. You have a model of the network as it is. The question is what happens after a change: a main uprated, a pump swapped, a valve shut, a new development connected. Scenarios are how you ask that question without an edit to the model you trust.
If the model is not open yet, start at Build a model from GIS or Bring in an existing model.
What a scenario is
Section titled “What a scenario is”A scenario is a branch of the model. When you create one, the app copies the model as it stands and puts you on the copy. From that moment two models are open: Main, and the scenario. An edit in the scenario cannot change Main.
Three things follow from that, and they are the three to know before you start:
- Every scenario branches from Main. Scenarios sit side by side, never one inside another. You cannot branch a scenario from another scenario. The switcher shows them as a flat list under Main.
- Main becomes read-only as soon as the first scenario exists. It stays read-only until you delete the last scenario. This lock is deliberate. It keeps the baseline unchanged while the scenarios that came from it are open.
- Scenarios are part of the project. When you create, edit, rename or delete a scenario, the app keeps that change in the project. Save writes the scenarios into the project file with everything else. When you open the project again, the scenarios are there.
Before you start
Section titled “Before you start”To create scenarios, you need a paid plan. Without a paid plan, an attempt to create, rename or delete a scenario opens Upgrade to access scenarios. The two demo networks are the exception. On these two networks, scenarios are free, so you can try the whole workflow before you decide anything. See Plans.
To look at scenarios, you do not need a paid plan. A project that holds scenarios opens on any plan. With any account, you can switch to the scenarios of the project and read them. Without a paid plan, the scenarios are read-only. Main is read-only too, because it stays locked while the scenarios exist. If you are signed out, a click on a scenario opens Sign in to view scenarios. See Accounts and privacy.
You also need a network. On an empty project, the attempt stops at Network required.
Creating the first scenario
Section titled “Creating the first scenario”-
Get the baseline right
Section titled “Get the baseline right”Run Main first. Make sure that you are satisfied with the result. A scenario is only as useful as the baseline you compare it with.
If the results are out of date when you create the first scenario, the app runs the model for you before it goes any further. A clean run carries straight on. A run that warns or fails stops on the summary. There, Ignore and create scenario takes the scenario anyway.
-
Press Enable Scenarios
Section titled “Press Enable Scenarios”The control is at the left of the status bar, next to the units. The status bar runs along the bottom of the window. After the first scenario exists, the control becomes the switcher and shows which branch you are on.
-
Read the notice, then Create scenario
Section titled “Read the notice, then Create scenario”The first time only, Create scenario tells you what scenarios are for. It then notes two things:
- The main model becomes read-only while scenarios exist.
- When you delete all the scenarios, Main unlocks again.
Don’t show this again hides the notice next time. Create scenario confirms, and Cancel backs out.
-
You are now in the scenario
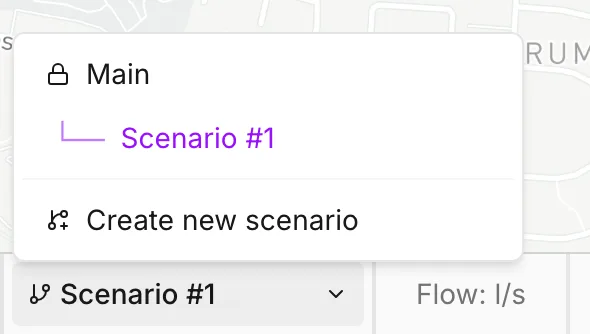
Section titled “You are now in the scenario”Scenario created confirms it. The new branch is called
Scenario #1, and the switcher moves to it. Everything you do from here happens in that branch.
Working in a scenario
Section titled “Working in a scenario”Edit the model in a scenario the same way as anywhere else:
- Change attributes in the Asset tab or the data tables.
- Draw new assets.
- Delete existing assets.
- Change the status of a pipe.
Undo and redo work only inside the branch you are on. Each branch keeps its own history.
Where a scenario differs from Main, the Asset tab shows it. A changed field carries a colored stripe down its left edge. When you hover over that field, the app shows Main and the value the field has on the baseline. You can see what you changed without a switch back to the baseline. An asset that only exists in the scenario carries the same stripe down the panel header.
Then press Simulate. The results belong to that branch. If you switch away and back, the results are still there. The app solves each scenario independently. See Running a simulation.
Comparing against the baseline
Section titled “Comparing against the baseline”The graph at the foot of the Asset tab draws the comparison. After an extended-period run, select an asset in a scenario. The graph plots two series over the whole run: the scenario, and Main. The gap between the two lines is the effect of the change.
Both branches need results for this. Until you run Main, the graph shows one line only. See Graphs.
For everything else, switch between the branches to compare them. The map, the status bar and the report all show the branch you are on. Move between the branches at the same timestep for a direct before-and-after.
Moving between branches
Section titled “Moving between branches”The switcher lists Main first, and the scenarios under it. Click a scenario to switch to it. At the foot of the list, Create new scenario takes another branch from Main, not from the branch you are on. Each scenario has its own menu with Rename and Delete.
Three shortcuts do the same work without the mouse:
| Shortcut | What it does |
|---|---|
| Alt+Y | Create a new scenario |
| Y | Switch back and forth between the last two |
| Shift+Y | Go to Main |
Y is the one to learn. If your last two branches are a scenario and Main, this shortcut moves between them. That movement is what a comparison is made of. While a run plays back, the app ignores a switch and disables the switcher. See Keyboard shortcuts.
Rename Scenario takes any name under Scenario name, except Main,
which is reserved, and except a name already in use. A rename early is worth
the few seconds, because Scenario #1 and Scenario #2 have no meaning by the
third one.
Delete Scenario asks for confirmation, and you cannot undo it. The branch and its results go together. If you delete the branch you are on, the app moves you to another scenario. If you delete the last scenario, the app returns you to Main and unlocks it. The numbering then starts again from one.
What scenarios do not vary
Section titled “What scenarios do not vary”Scenarios branch the model. Some things sit outside the model, and the app freezes them for as long as any scenario exists:
- Simulation settings become read-only. These settings include the duration, the timesteps, the demand model, the quality settings and the energy defaults. Every branch runs with the same settings. As a result, you always compare the branches under the same conditions. To vary a run setting, change it on Main with no scenarios open. See Simulation settings.
- You cannot add, rename or delete Custom attributes. You can still edit the value on each asset, but you cannot edit the definitions. See Custom attributes.
- Allocate customer points is unavailable. File > Import > Customer points is unavailable too. The import and the allocation both belong to the baseline model. See Customer points.
Saving, and getting results out
Section titled “Saving, and getting results out”A change in a scenario is a change to the project. When you create, edit,
rename or delete a scenario, the unsaved dot appears beside the project name.
Save writes every scenario into the .ejsdb together with Main. See
Projects.
An INP holds one model. As a result, File > Export > EPANET INP exports Main, whatever branch you are on. The scenarios stay in the project file. See Import and export.
To apply a decision to Main itself, delete the scenarios to unlock it. Then make the change that you decided on there, one time and with care. Save the project after the change.
- The asset tab — where the change stripes and the comparison graph are.
- Running a simulation — the checks before a run, and how to read the outcome.
- Graphs — the quick graph, and how to build your own.
- Simulation settings — the settings a scenario cannot vary.
- Plans — which plans include scenarios.