
Pipes
A pipe is a link between two nodes. The app draws it as a line, with as many vertices as you give it. A pipe comes from the Pipe tool (5), from the model builder, or from an INP. When you drop a node on a pipe, or when you draw a link that lands on it, the pipe splits into two pipes.
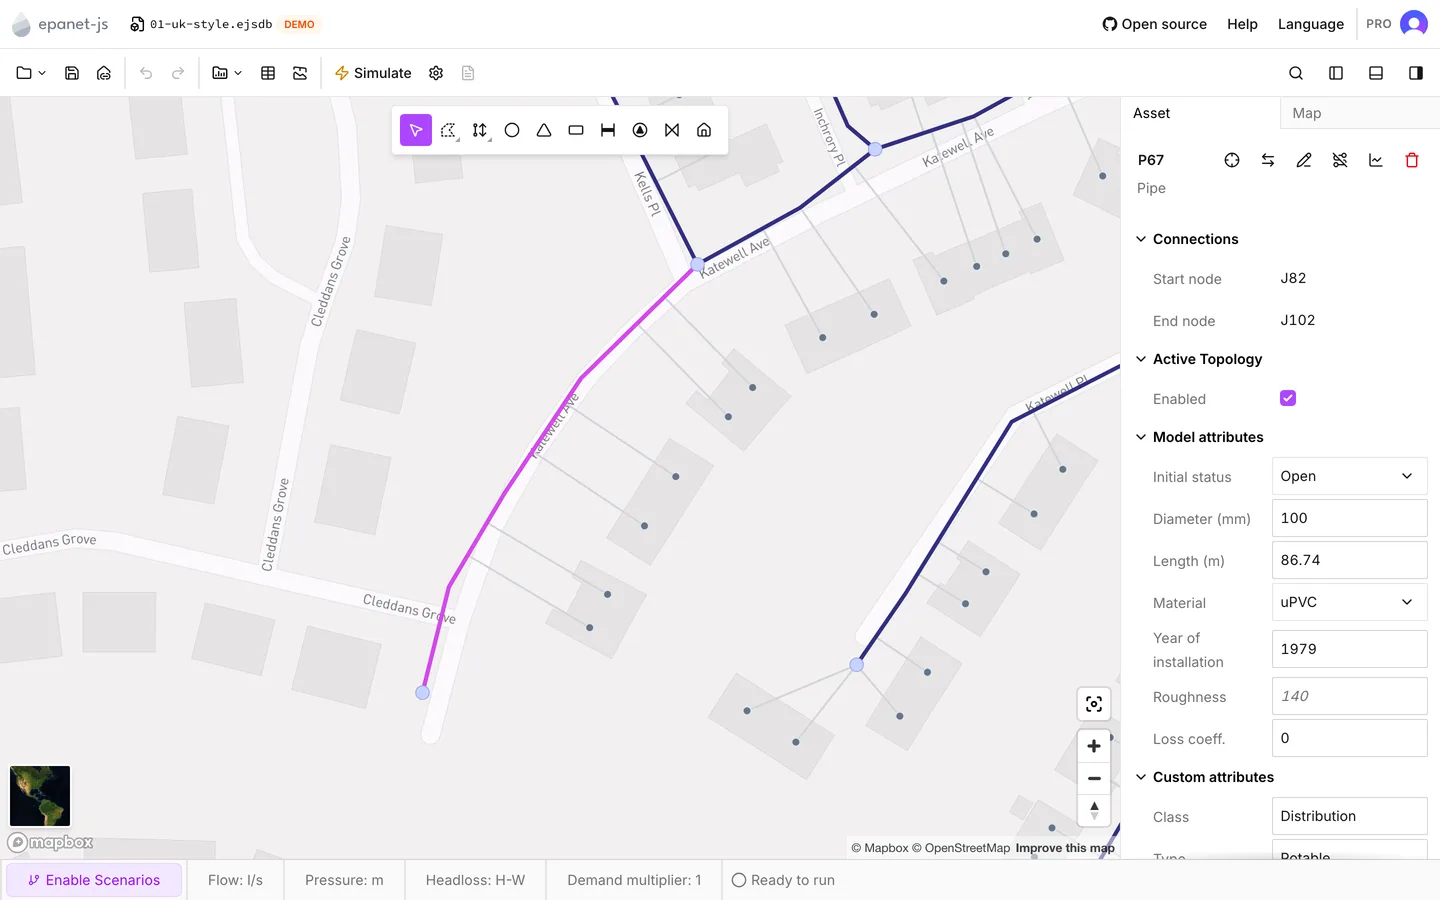
When you select a pipe, the side panel opens on the Asset tab. See The Asset tab for the panel. See Drawing and editing for how to draw a pipe, how to split it, and how to use Redraw and Reverse.
Connections
Section titled “Connections”Start node and End node are read-only. The ends of a pipe come from where you drew it. To change them, you redraw the pipe. You cannot type them in.
The order of the two nodes matters. It fixes the sign of the reported flow, and the direction that a check valve allows. Reverse in the panel header swaps the two nodes, and R does the same.
Model attributes
Section titled “Model attributes”Initial status
Section titled “Initial status”Open, Closed or Check valve sets how the pipe starts the run.
- Open is the default. Flow can pass in either direction.
- Closed takes the pipe out of the hydraulics, but not out of the model. The pipe is still exported, still drawn and still connected, but it carries no flow. A Legacy EPANET controls statement can open it again partway through the run. The native Controls section acts on pumps only. See Controls.
- Check valve allows flow from the start node to the end node only. The direction you drew is thus part of the model. This is how you model a non-return valve without a valve asset.
Initial status is what you set. Actual status under Simulation results is what the engine did with it. The two differ when a check valve shuts, or when a control opens something.
Diameter and length
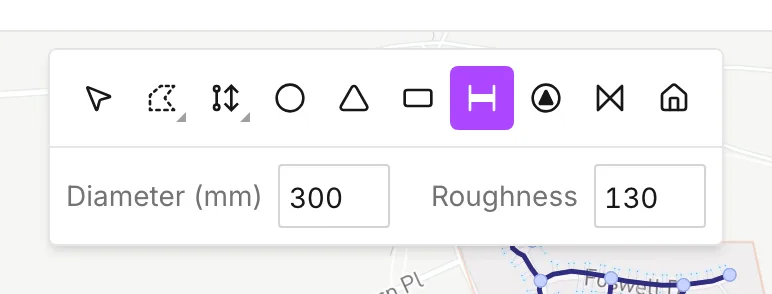
Section titled “Diameter and length”Diameter is required, and it must be more than zero. It uses the diameter unit of the project. A new pipe takes the diameter that the pipe defaults strip shows when you draw it.
Length uses the length unit of the project. The app measures it from the line you drew, and writes it again every time the geometry changes:
- You draw the pipe.
- You move or merge a node at either end.
- You split the pipe.
- You redraw the pipe.
The settings popover in the status bar reports Auto-lengths as On, and there is no switch for it. You can type a length in. It holds until the next change to the geometry replaces it.
Material and year of installation
Section titled “Material and year of installation”Material and Year of installation are a paid feature, except on the demo networks. On the free plan, the two rows still show what an import brought in. The rows are covered, and the label carries a lock marked Paid feature. See Plans.
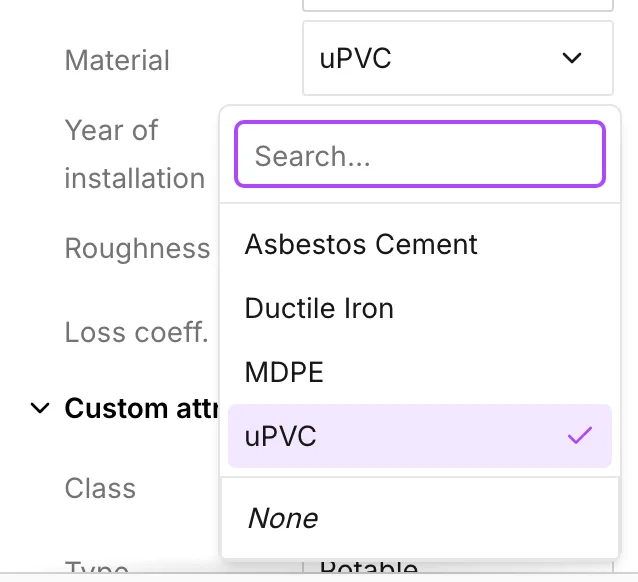
Material is a list of every material in the pipe library of the project. The
list also holds each material that a pipe in the model uses and the library does
not cover. You can type a new material. The match ignores upper and lower case.
If you type ductile iron where the library has Ductile Iron, the app keeps
the spelling of the library, and it does not make a second material.
Year of installation must be a four-digit year. The app reports every other value as Pipe installation year invalid.
Roughness
Section titled “Roughness”Roughness carries no unit. The meaning of the number follows the headloss formula of the project:
- For Hazen-Williams, the number is a C-factor. A new pipe takes 130.
- For Darcy-Weisbach, the number is a roughness height. A new pipe takes 0.1.
- For Chezy-Manning, the number is an n. A new pipe takes 0.011.
The pipe defaults strip can give a new pipe another value. You set the formula in Simulation settings. See the EPANET 2.2 manual for the formulae themselves.
A pipe does not have to carry its own roughness. If the field is empty and the pipe has a Material that the pipe library knows, the field shows the value of the library for that material at that age. The field shows this value in italics, because it is a placeholder and not a value. The run and the exported INP use this roughness.
If you type a number in, that number overrides the library for that pipe. If you clear the field again, the library takes over. This is the one property where what the panel shows and what the pipe stores are not the same. The italics are the sign of it.
A material with one roughness entry supplies that entry at every age. A material with a roughness for several ages also needs the Year of installation of the pipe. Without that year, this material supplies nothing.
Two warnings from the Model attributes check are about this pair of values:
- Pipe material not in the pipe library
- No roughness in the pipe library for this material and year
After either warning, the pipe has no roughness at all. That is the error Pipe roughness missing. See Pipe library and Network review.
Loss coeff.
Section titled “Loss coeff.”Loss coeff. is the minor loss coefficient of the pipe, and it is optional. An empty field counts as zero, and the app writes nothing to the run. The coefficient stands for the whole pipe. When you split a pipe, both halves get a copy of the coefficient.
The other sections
Section titled “The other sections”- Custom attributes — your own fields, when the project defines them for pipes. See Custom attributes.
- Demands — this section appears only when customer points are connected to the pipe. It reports the total demand of those points and their count. If the points carry a pattern, it reports the pattern as well. The app applies the demand at the junction that the points are allocated to, not at the pipe. See Customer points.
- Quality — Bulk reaction coefficient and Wall reaction coefficient. Both are optional. If a field is empty, the pipe uses the project-wide value, which the field shows as its placeholder. See Water quality.
Simulation results
Section titled “Simulation results”| Row | What it is |
|---|---|
| Flow | Flow at this timestep. The direction of the pipe gives the sign |
| Velocity | Velocity at this timestep |
| Unit headloss | Headloss per unit length |
| Headloss | Headloss over the whole pipe |
| Actual status | Open or Closed, as the run left it |
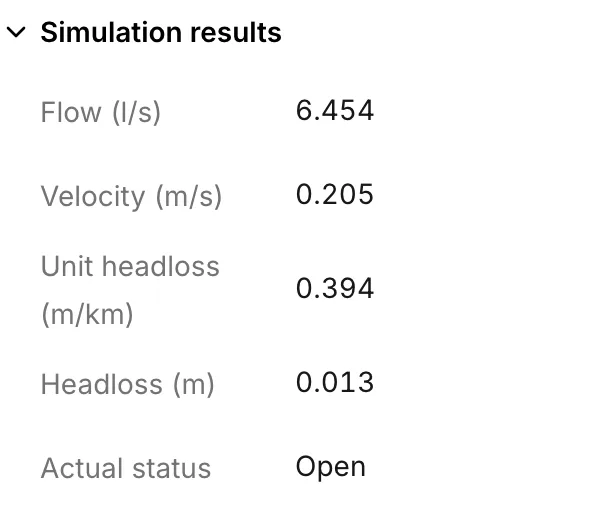
Water age, Water trace and Chemical join these rows when the run produced them. Every row follows the timestep that the time browser shows. See Reading results.
What reaches the run
Section titled “What reaches the run”For each pipe that is enabled, the model writes the length, the diameter and the effective roughness. The effective roughness is the value of the pipe, or the value of the library. The model writes the minor loss and the status only when there is something to say. That is a coefficient other than zero, or a status other than open. The model leaves a disabled pipe out of the run and out of an exported INP.
Working on many pipes
Section titled “Working on many pipes”- When you select several pipes, the multi-asset panel sets these values across the whole selection in one step: Initial status, Diameter, Length, Material, Year of installation, Roughness, Loss coeff. and the two reaction coefficients. When you click a value in one of its summaries, the app selects only the pipes that hold that value. This is how you get from “some of these are 100 mm” to the pipes you want to edit.
- The Pipes tab of the data tables sorts the pipes, and takes a paste down a column.
- Symbology colors links by Diameter or Roughness before a run, and by Flow, Velocity or Unit headloss after one.
- Graphs plots Flow, Velocity or Unit headloss at one pipe across the whole run.
- Pipe library — materials, ages and the roughness they imply.
- Valves — when the thing you are modeling needs more than a check valve.
- Junctions — the nodes at either end.