
Tanks
A tank is a node with storage. It has a fixed floor, a water level, and a level range. The level rises and falls with what flows in and out, and it stays inside that range. The model treats tanks and reservoirs as supply. If a sub-network has no tank and no reservoir, the connectivity check reports it as a sub-network with no supply source. A tank and a reservoir both stop a selection trace.
Tanks come from the Tank tool (4), from a GIS build, or from an INP. When you select one, the side panel opens on the Asset tab. See The Asset tab for the panel itself. A tank you draw arrives with only its Elevation filled in. Everything else about its geometry is blank, so the tank is invalid the moment it exists, and the panel opens on it straight away. See Drawing and editing to learn how to place a tank, and how to turn an existing junction into a tank.
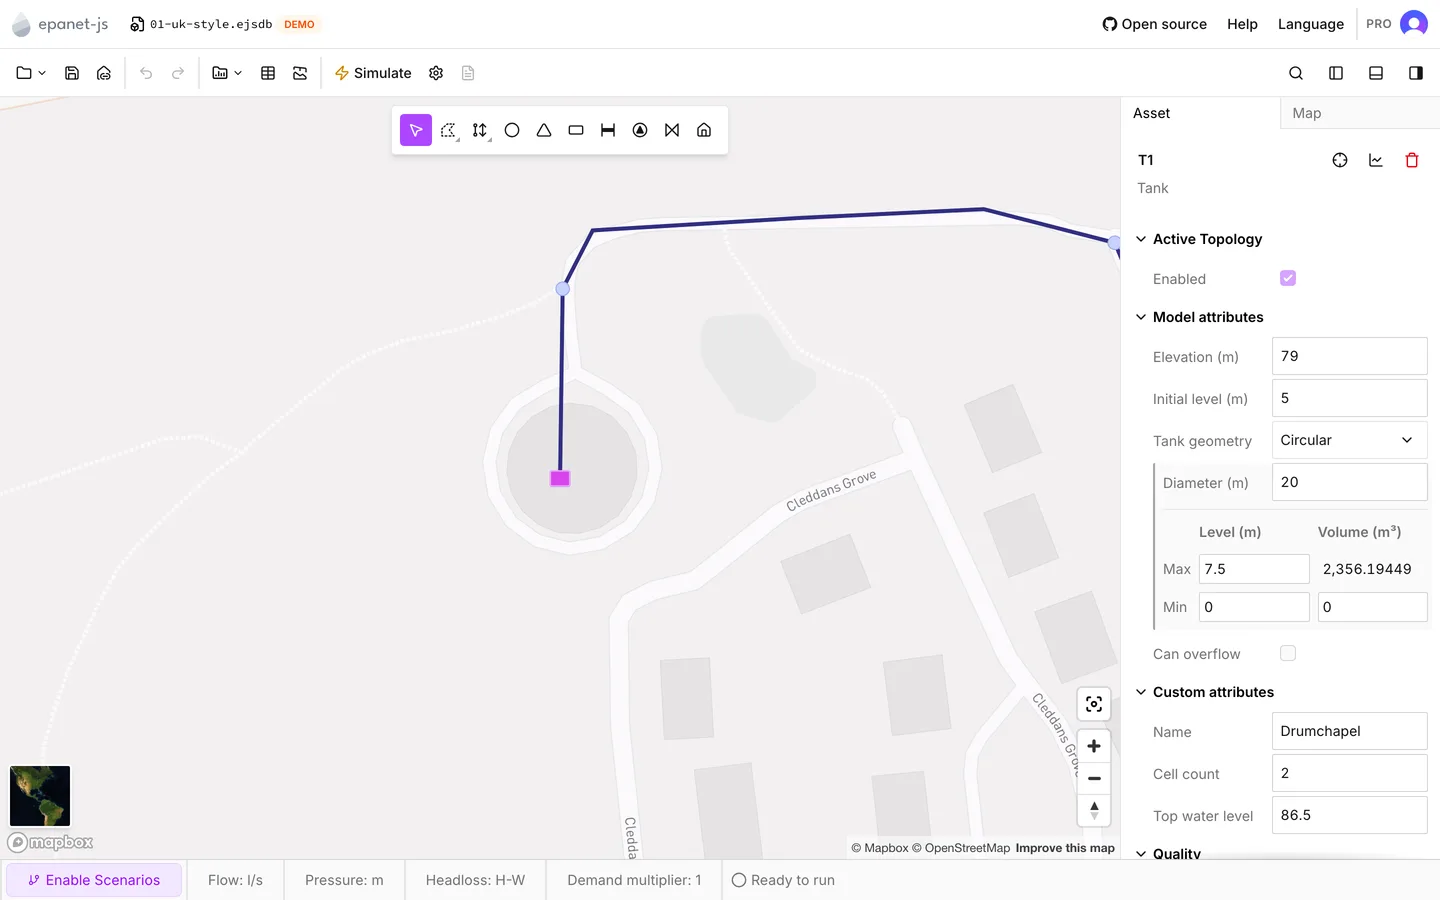
Model attributes
Section titled “Model attributes”Elevation is the elevation of the tank’s floor, in the project’s length unit. The app measures every level on the tank up from this elevation. It reads the elevation from the terrain when you place the tank, and again when you move it. If Auto-elevations is off, the app does not read it. Both Recalculate missing elevations and Recalculate all elevations include tanks. See Elevations.
Initial level is the depth of water at the start of the run. It is measured from the floor, not as an absolute head. It must be zero or greater, and between Min level and Max level.
Can overflow says whether the tank can spill after it reaches its maximum level. It is off on a new tank. For what each setting does to a run, see the EPANET 2.2 manual.
Tank geometry
Section titled “Tank geometry”Tank geometry is the row that decides how the storage is described. It has four options. The first three are three ways to write down the same thing: the tank’s cross-sectional area. The model stores that area as a diameter.
| Tank geometry | What it asks for above the table |
|---|---|
| Circular | Diameter, in the project’s length unit |
| Uniform area | Area, in square length units |
| Total volume | Nothing. You type the volumes in the table instead |
| Volume curve | A curve of level against volume |
Under the row is a two-by-two table. It has Level and Volume across the top with their units, and Max and Min down the side. The first three options change which of the four cells you can type into.
- On Circular and Uniform area you type Max level, Min level and, if you want, Min volume. The app calculates Max volume and shows it read-only.
- On Total volume you type all four. When you change one of them, the app recalculates the diameter, so that the tank still holds the Max volume you asked for.
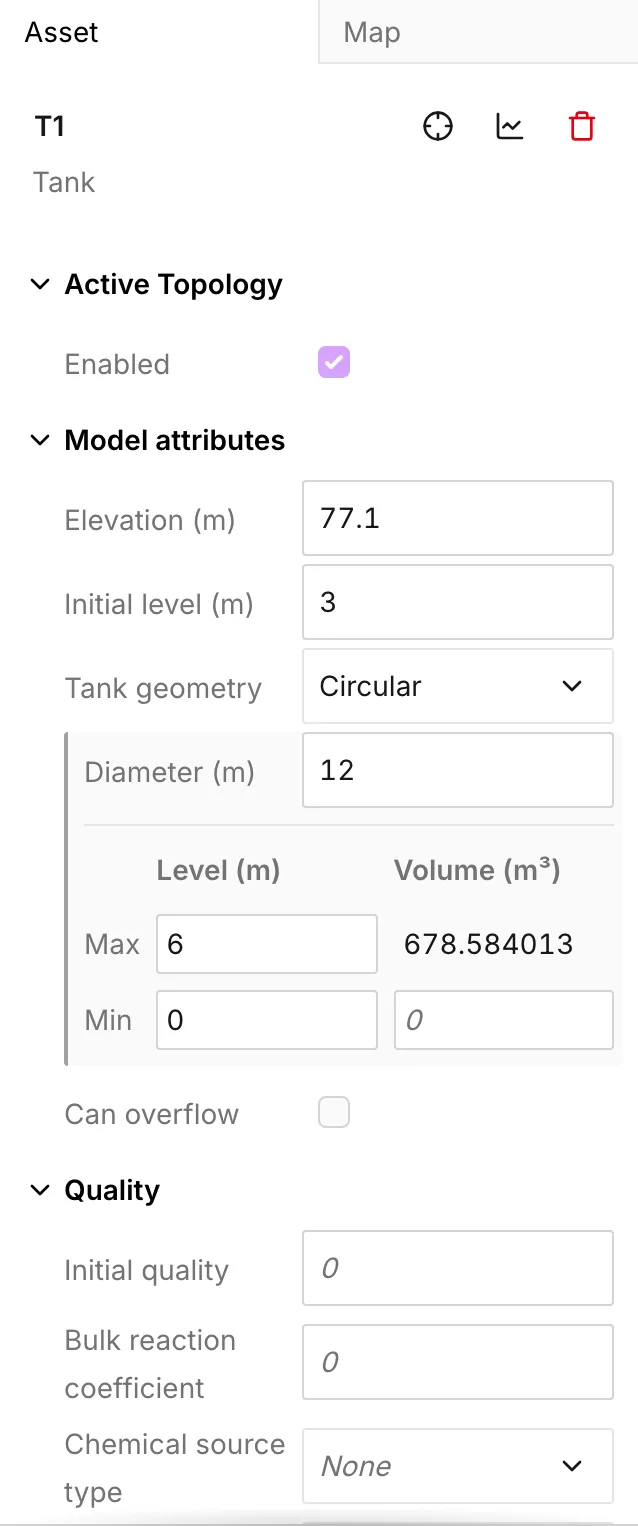
The arithmetic is the same either way. If Min volume is zero, Max volume is the area multiplied by Max level. If Min volume is more than zero, Max volume is that volume plus the area multiplied by the depth between the two levels.
Volume curve
Section titled “Volume curve”Volume curve replaces the geometry with a curve of level against volume, taken from the project’s curves under Tank volume. You choose one under Volume curve. You can also press Open curves… and build a curve in the panel. See Curves.
When you attach a curve, the app rewrites three of the tank’s own values from the end points of the curve. Min level and Min volume come from the first point, and Max level comes from the last point. The table then shows all four values read-only, because the curve is the authority on them.
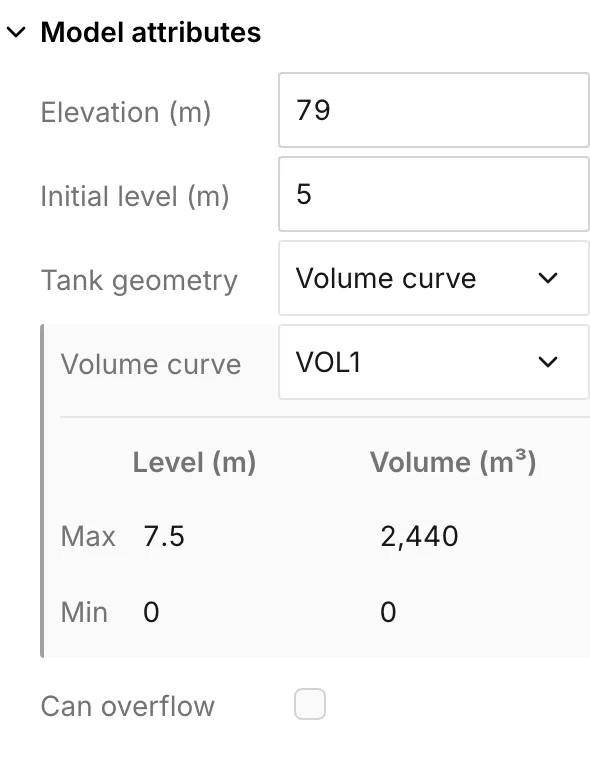
A run or an exported INP carries the curve, and a diameter with it, because EPANET expects a non-zero diameter on every tank. That diameter is the tank’s own where it has one, and a nominal 1 where it has none. The number is only a stand-in. The curve is the geometry the engine reads.
What the checks say
Section titled “What the checks say”The Model attributes check reports a tank with values missing or out of range. See Network review for the panel it appears in. The check gives these messages:
- Elevation missing, Tank initial level missing, and Tank initial level must be zero or greater
- Tank initial level must be between the minimum and maximum levels
- Tank minimum level missing, Tank minimum level must be zero or greater, Tank maximum level missing and Tank maximum level must be positive
- Tank maximum level should be greater than the minimum level is a warning, not an error. It still stops the pre-run check.
- Tank diameter missing and Tank diameter must be positive
- Tank minimum volume must be zero or greater
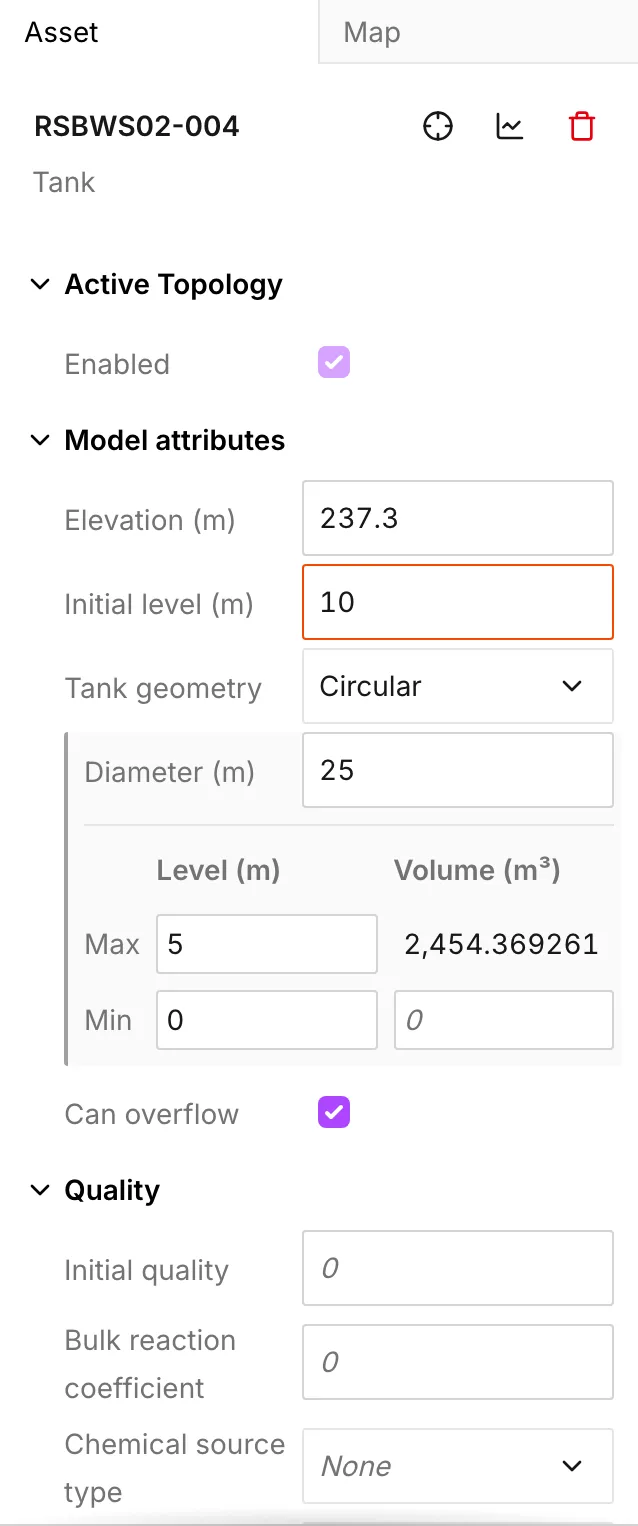
On a tank with a volume curve, the check skips the rules about Min level, Max level and Diameter. It also skips the rule that the initial level must fall inside the range, because the curve supplies all four values. Elevation, Initial level and the sign check on Min volume apply either way.
Quality
Section titled “Quality”The Quality section affects a run only after you switch on water quality analysis. See Water quality. The section has these rows:
- Initial quality is the concentration or age the tank starts at. Empty means 0.
- Bulk reaction coefficient is the reaction rate for the water held in this tank. Empty means the project-wide Global bulk coefficient, which the app shows as the placeholder. The order that goes with it is Tank reaction order in Simulation settings.
- Chemical source type, Source strength and Source pattern make the tank a source of chemical. They are the same three rows a junction has.
- Mixing model says how the water already in the tank mixes with what arrives. The four options are Complete mix, Two-compartment, First in, first out and Last in, first out, and a new tank is Complete mix. When you choose Two-compartment, the app adds a Mixing fraction row underneath. Mixing fraction is the share of the tank taken by the inlet compartment. It must be between 0 and 1, and empty means 1. The EPANET 2.2 manual describes what each model does.
Simulation results
Section titled “Simulation results”After a run the section shows these rows, for the timestep the time browser is on:
| Row | What it is |
|---|---|
| Pressure | Pressure at the tank. Level is this pressure converted to a length |
| Min pressure | The lowest over the whole run |
| Max pressure | The highest over the whole run |
| Head | Total head: the tank’s elevation plus its level |
| Level | Depth of water above the floor |
| Volume | Water stored at this timestep |
| Net flow | Flow into the tank from the network. A tank that is drawn down reads negative |
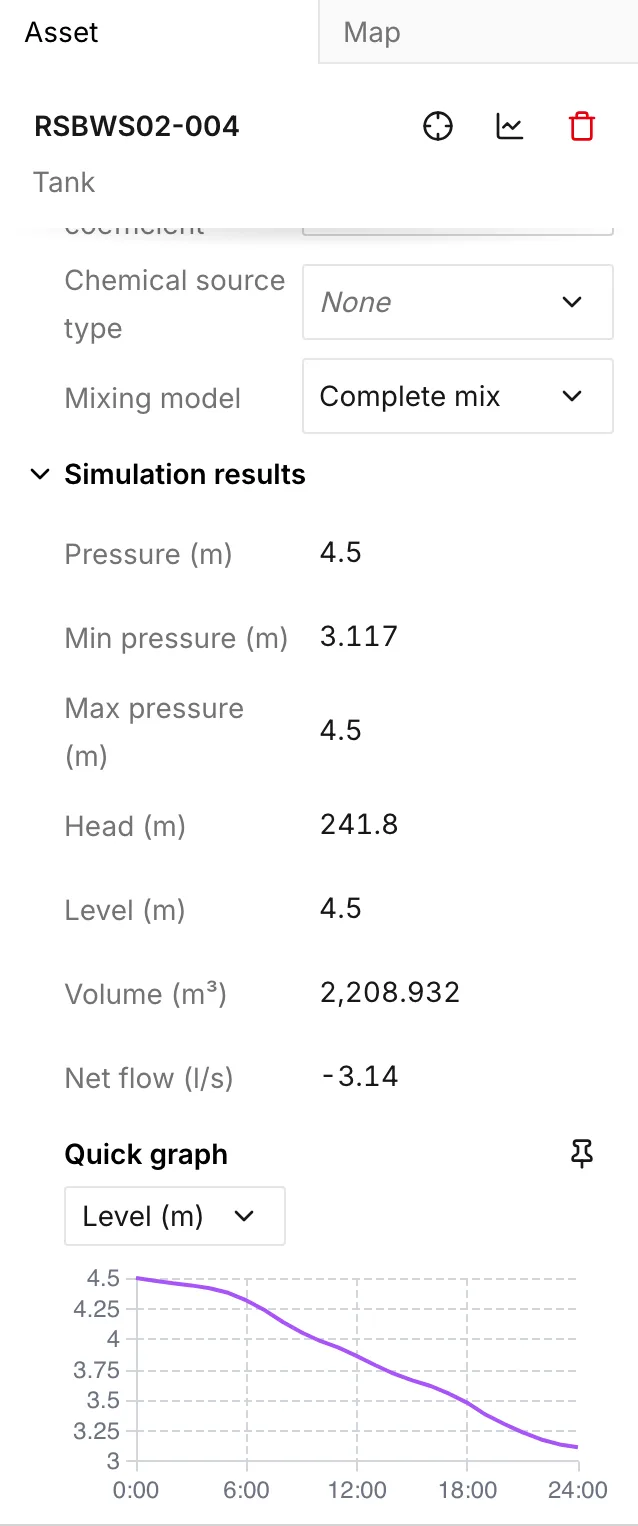
Water age, Water trace and Chemical join these rows when the run produced them. Every row follows the time browser. See Reading results.
A tank is the asset a graph is most worth plotting on, because a tank changes over the run. View graph in the panel header plots Level, Volume, Net flow, Pressure or Head across the run in one click. See Graphs.
Controlling a pump from a tank
Section titled “Controlling a pump from a tank”A tank is what a Level-based pump control watches. When you choose Level-based in the Controls section of the pump, you get a Tank selector, an on level and an off level. Both levels must lie between the Min level and the Max level of that tank. The on level must be lower than the off level. If the levels break one of these two rules, the panel says so, and the message carries the tank’s own two numbers. In a model with no tanks at all, the Level-based option is unavailable. See Pumps and Controls.
What reaches the run
Section titled “What reaches the run”For each tank that is enabled the model writes:
- The elevation
- The initial, minimum and maximum levels
- The diameter
- The minimum volume
- The volume curve, where the tank has one
- Whether the tank can overflow
The model writes the mixing model only when it is something other than Complete mix. For a run it writes the mixing model only when quality analysis is switched on, but an exported INP carries it either way. The model leaves disabled tanks out entirely, out of the run and out of an exported INP alike. See The Asset tab.
One thing changes with the project’s Total duration. On an extended period run the model writes a missing level or diameter as a placeholder that the engine rejects, so the run fails. On a single-period snapshot, storage geometry does not come into it. The model writes the same blanks as zero, and the run proceeds. Either way the Model attributes check reports the blanks first. You meet the difference only when you press Run anyway. See Simulation settings and Running a simulation.
Working on many tanks
Section titled “Working on many tanks”- When you select several tanks, the multi-asset panel sets these rows across the whole selection: Elevation, Initial level, Min level, Max level, Diameter, Min volume, Can overflow, the quality rows and Mixing model. If one tank in the selection has a volume curve, Min level, Max level, Diameter and Min volume go read-only for the whole selection, not only for that tank. Deselect that tank to edit the others.
- The Tanks tab of the data tables has the same properties, plus a read-only Max volume column and a Volume curve column. The tab takes a paste down a column. On a row with a volume curve, Min level, Max level, Min volume and Diameter are read-only, exactly as in the panel. The grid has no equivalent of the Tank geometry row. It offers the diameter and nothing else, so a tank that you describe by its area or its total volume needs the panel.
- Reservoirs — the other source node, at a fixed head with no storage.
- Curves — where a volume curve is built.
- Controls — switching a pump on a tank level.
- Network review — the checks this page names.